
On this page
Visit Japan Web is free and optional. It lets you prepare your arrival information online and display a unified entry QR code for immigration and customs. Start from the Digital Agency's official Visit Japan Web page; its Start now link opens the registration service at vjw.digital.go.jp. Paper arrival forms remain available.
For an ordinary foreign visitor, complete both the immigration and customs questions for your planned arrival. Adding a passport or flight alone does not finish the process. Before departure, check that you can display the latest entry QR code for each traveler using the service.
Jump to account registration, intended stay and the day calculator, your entry QR code, or family registration.
What Is Visit Japan Web?
Visit Japan Web is the official online service operated by Japan's Digital Agency. It bundles three different arrival-related procedures into one account:
- Immigration entry information (replaces the paper disembarkation card)
- Customs declaration (replaces the yellow paper customs form)
- Tax-free shopping registration (used at participating retailers — a separate QR from the entry code)
For the first two — immigration and customs — Visit Japan Web generates a single unified 2D code that you scan at the airport. Since January 25, 2024, immigration and customs share the same code; older guides that mention separate "blue" and "red" QR codes are out of date.
For tax-free shopping, Visit Japan Web generates a separate QR code that you present at participating stores. This guide focuses on the entry 2D code; for the tax-free side, see Japan Tax-Free Shopping Guide 2026.
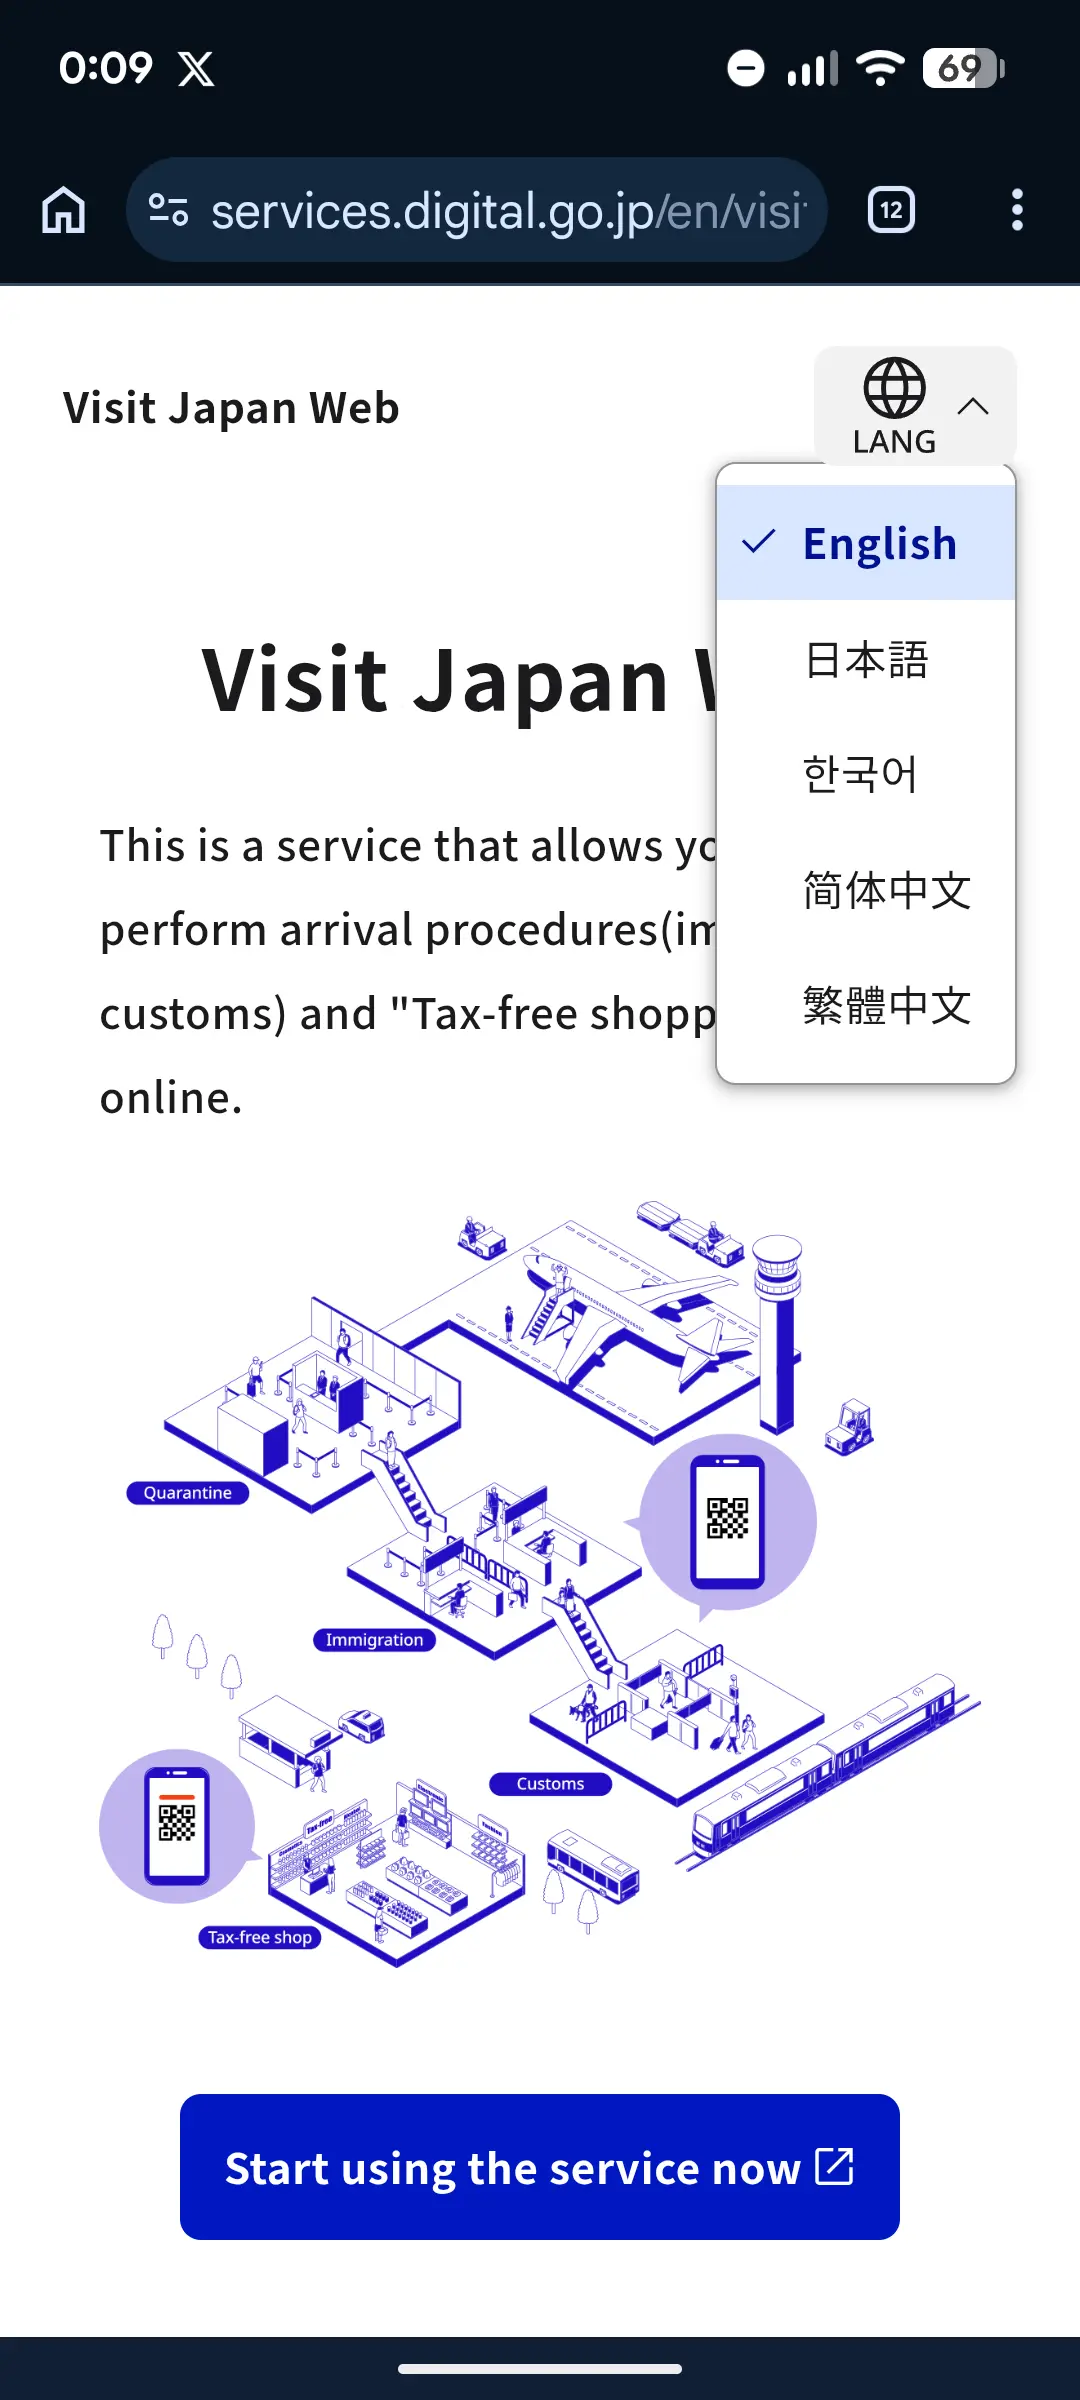
At busy airports, the unified 2D code can save significant time on arrival — primarily because you skip the paper forms and can use the electronic gates where available. Actual time savings depend on airport, hour, and how busy your flight is.
Who Should Use It
Visit Japan Web is available to all travelers entering Japan, including:
- Foreign tourists (visa-free and visa holders) — review Japan's current visa-free stay periods, then check your passport and dates with our Japan Visa Calculator
- Japanese nationals returning from abroad
- Foreign residents with re-entry permits
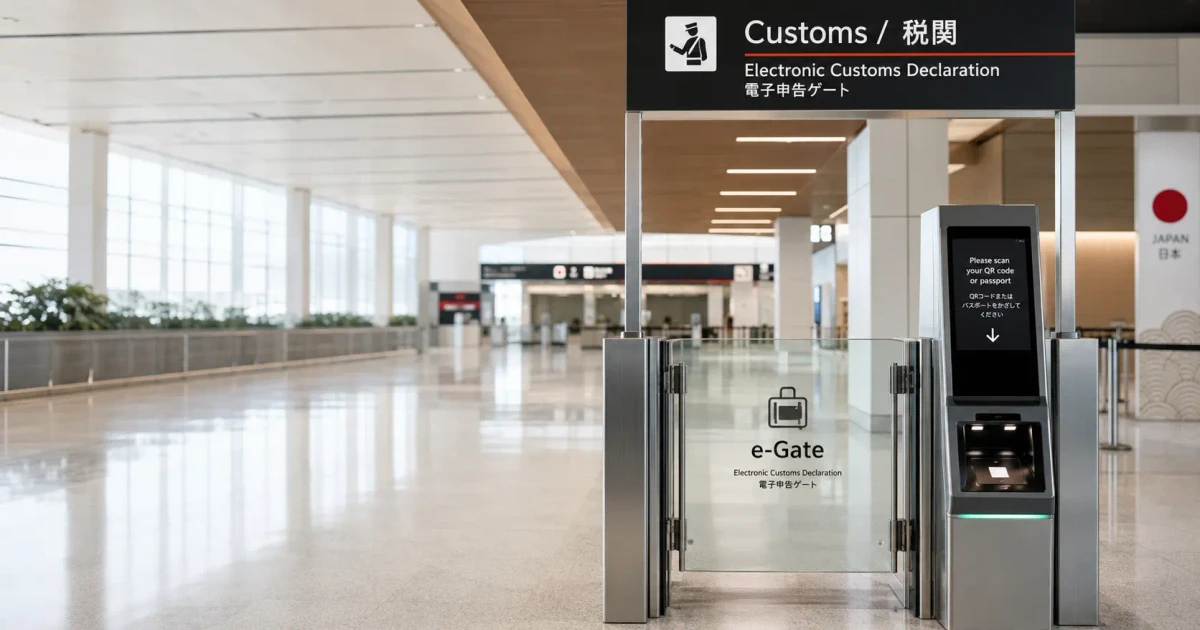
It's optional: the applicable paper forms remain available. The electronic customs declaration gates (e-Gates) at the major international airports use the Visit Japan Web 2D code; without it, follow airport signs and staff directions for the paper/manual route.
What You'll Need
Before you start, gather:
- Valid passport (you'll enter your passport number, expiration date, etc.)
- Flight details (airline, flight number, arrival date and airport)
- Accommodation address in Japan (hotel name and address; booking confirmation is fine)
- Email address (for creating your account)
- A device with internet (phone, tablet, or computer)
Step-by-Step Registration
Step 1: Create Your Account
Go to the official Visit Japan Web site at vjw.digital.go.jp and tap "Create a new account".
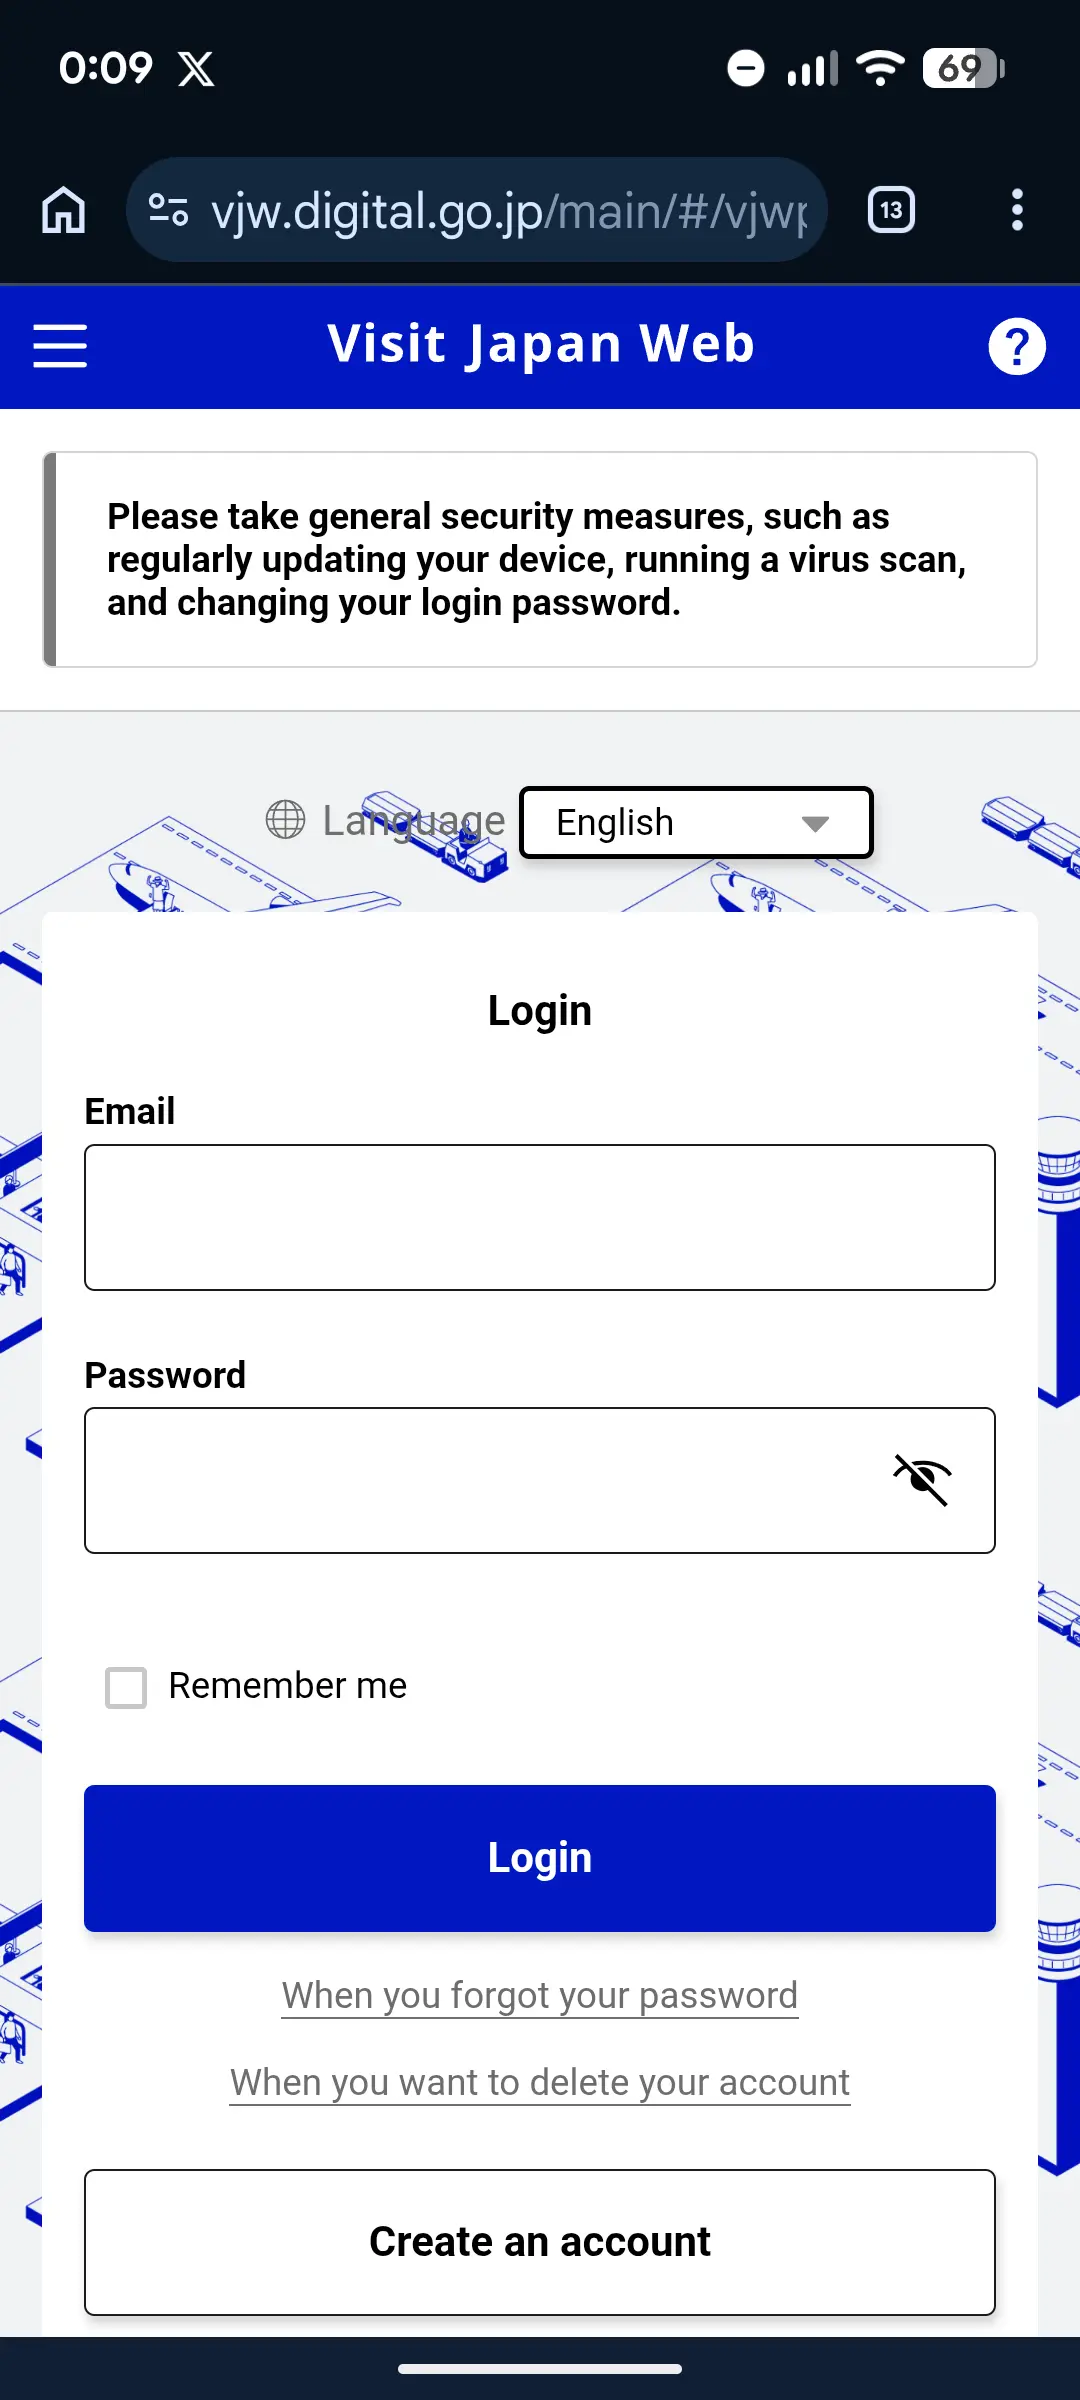
- Enter your email address
- Create a password — at least 10 characters, including uppercase, lowercase, numbers, and symbols
- You'll receive a verification code by email — enter it to activate your account
- Fill in your basic personal information (name as shown on passport, date of birth, nationality)
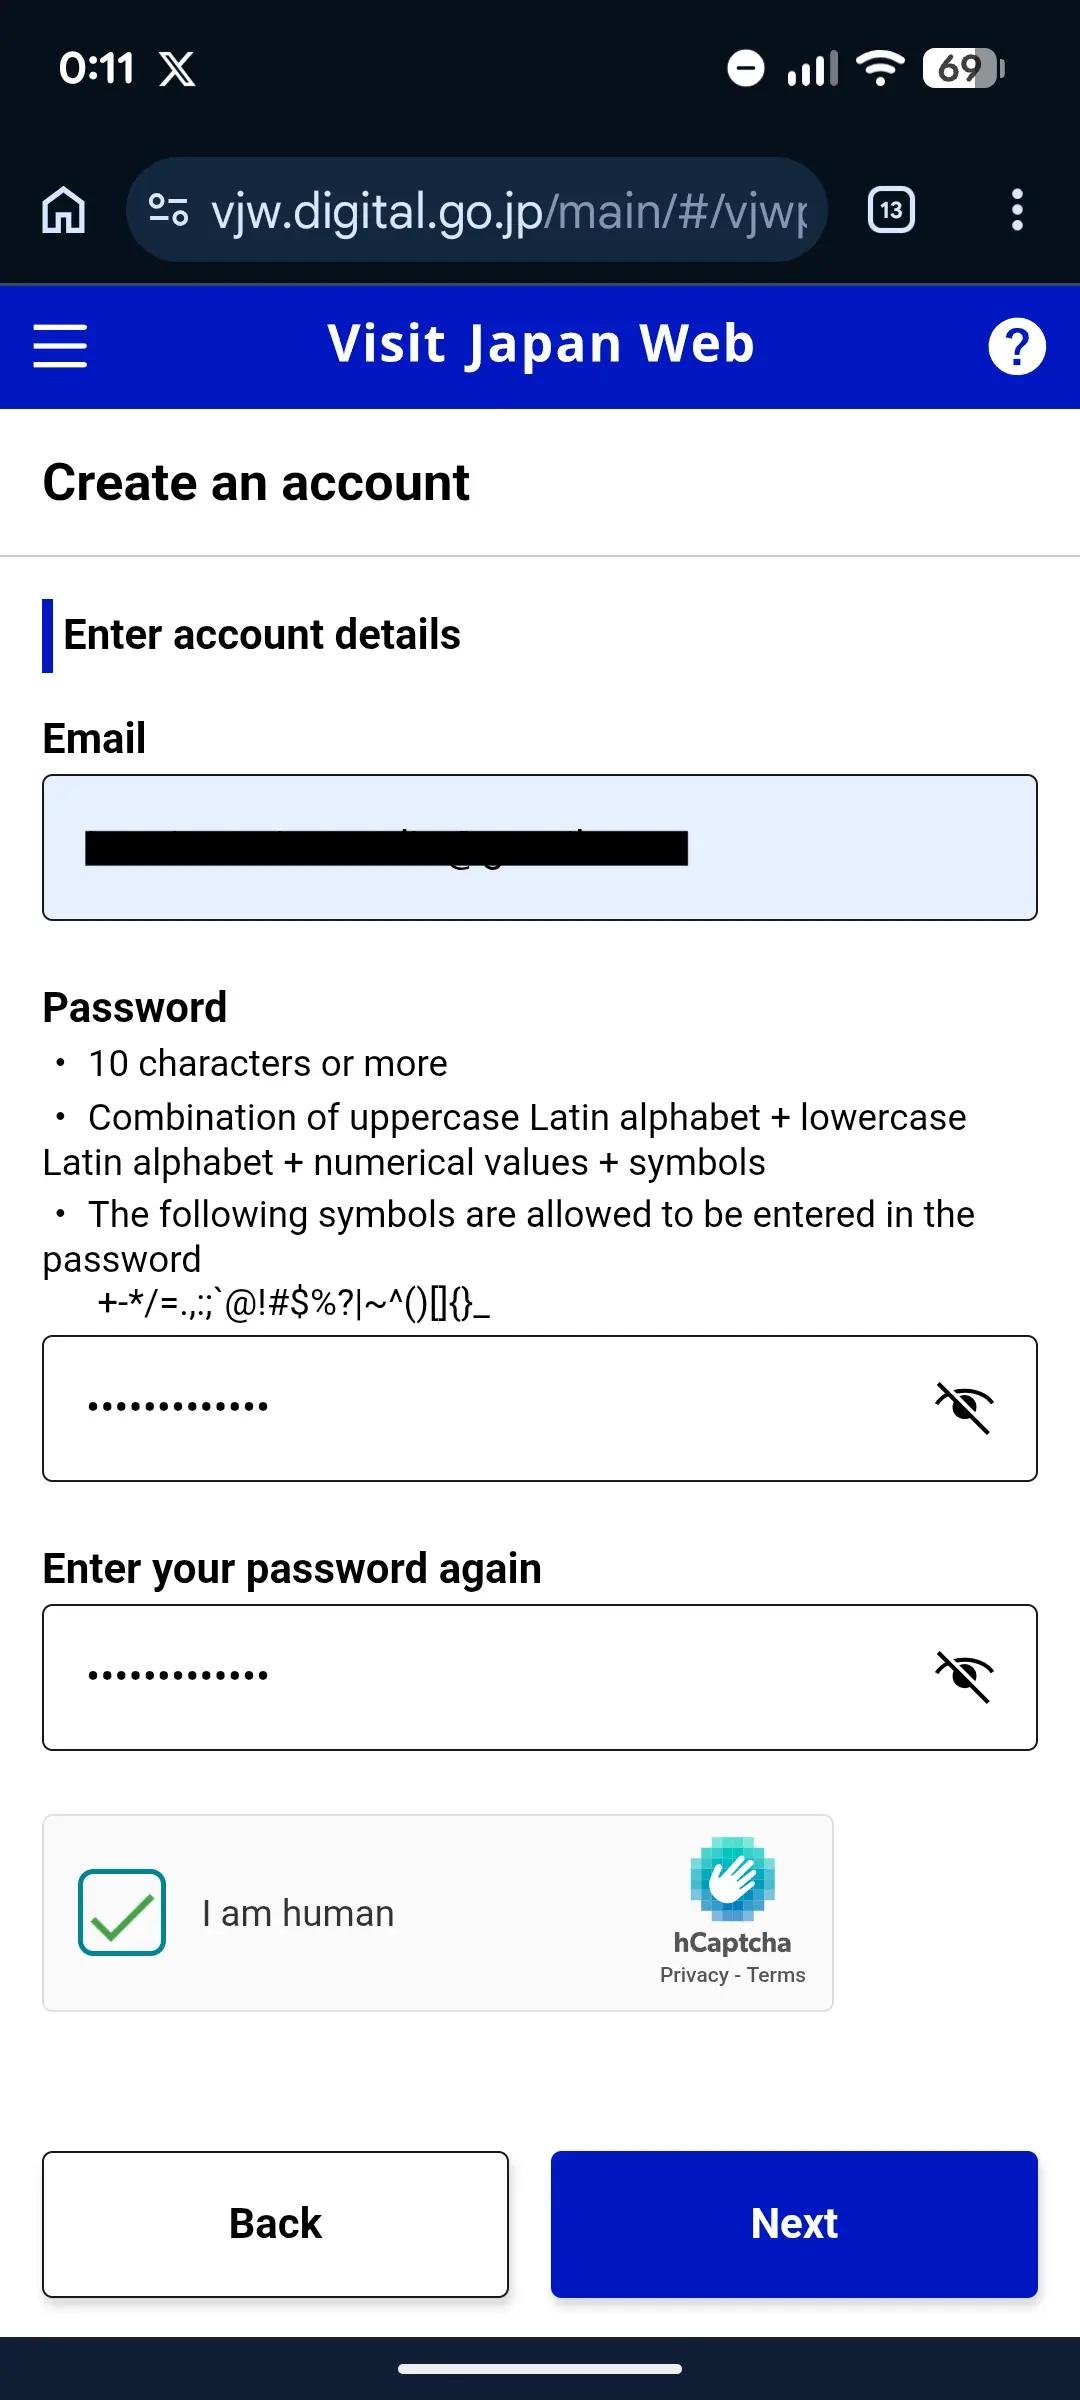
After your account is active, you land on the dashboard. From here you'll register your trip and your traveler details.
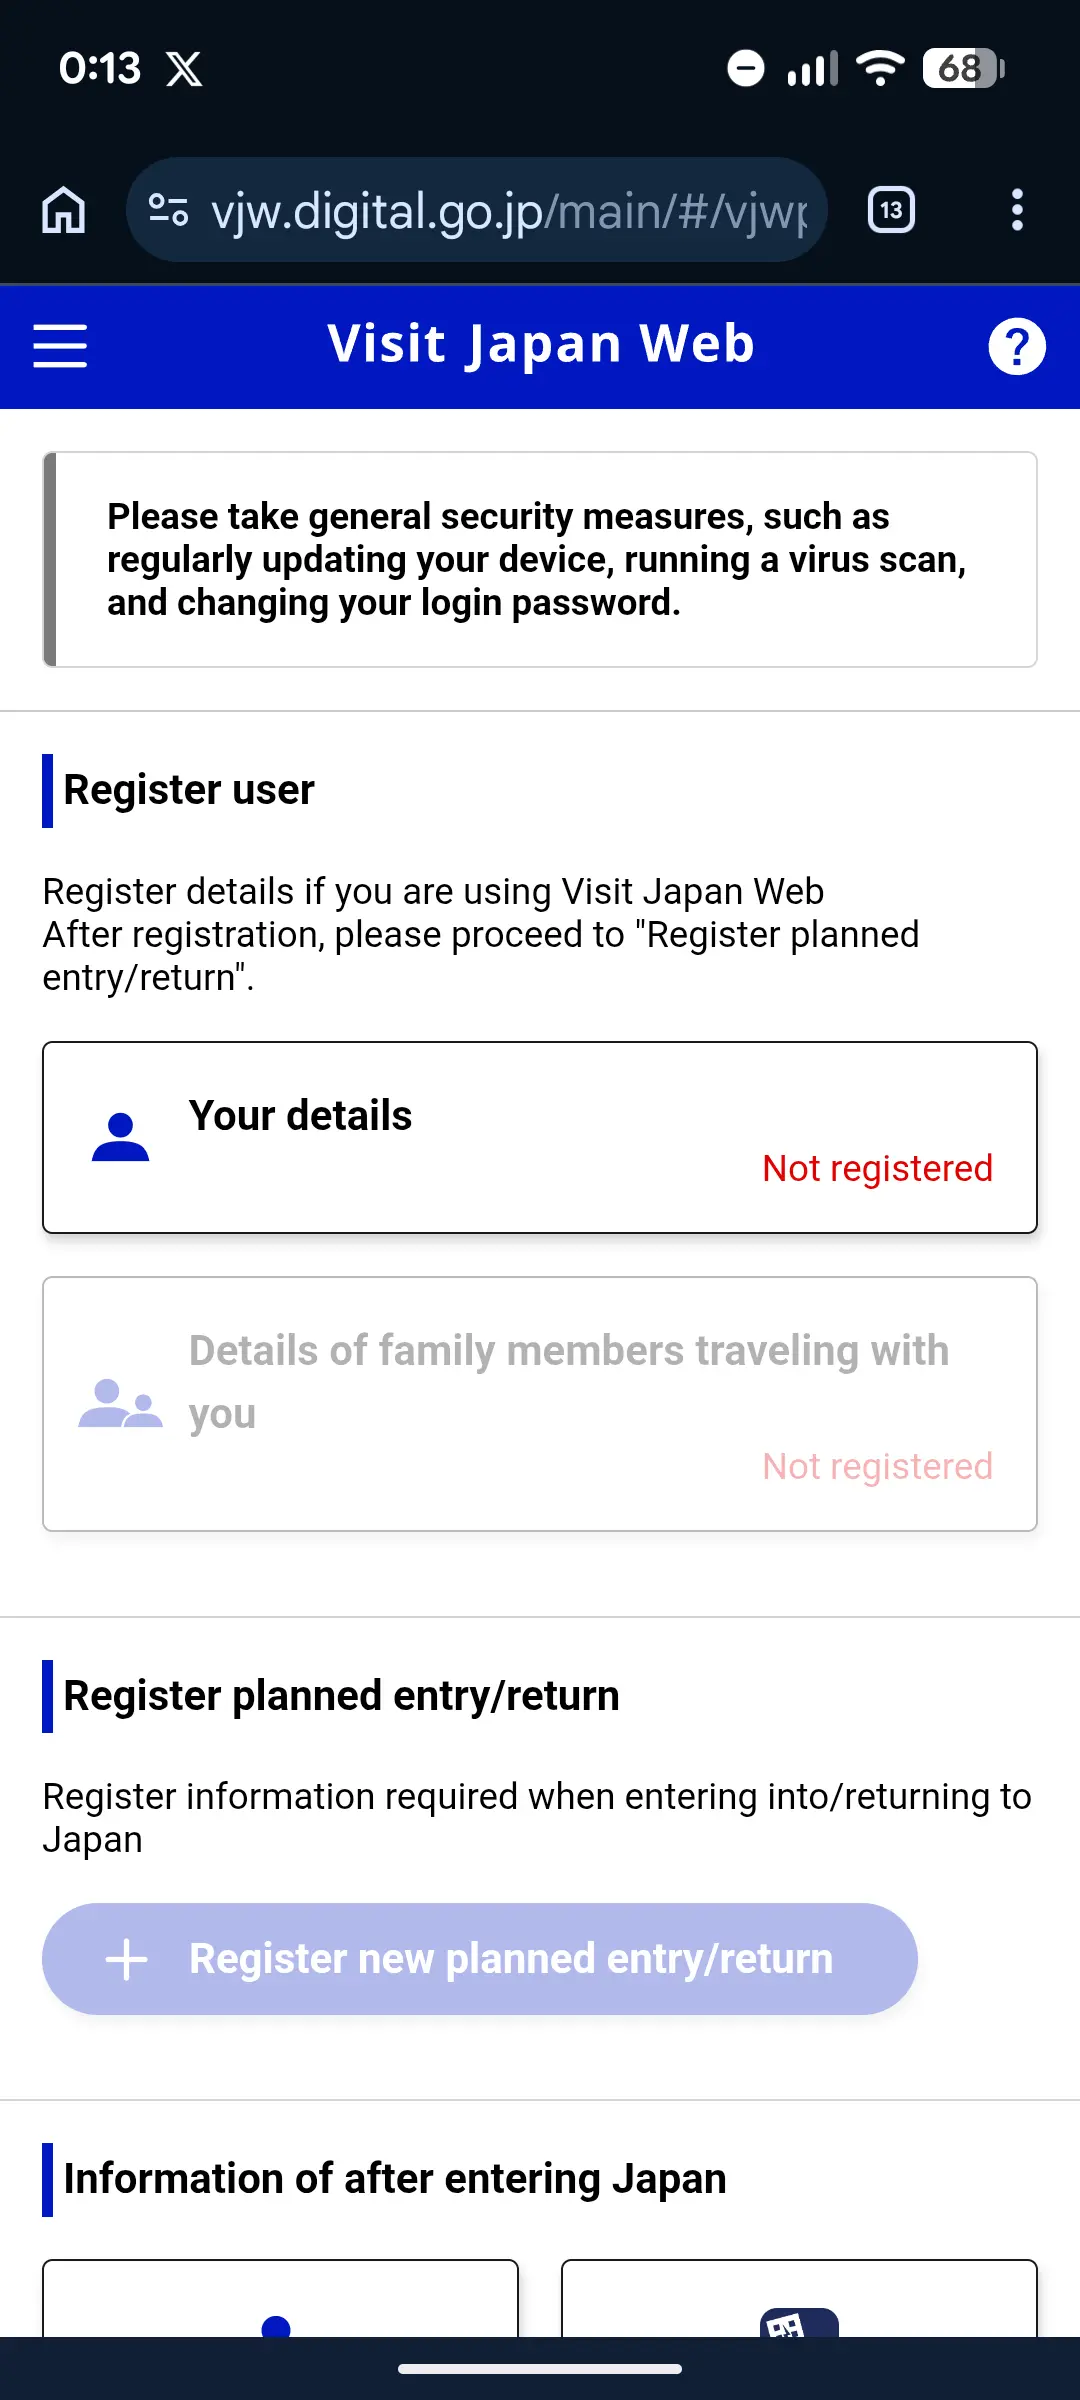
When you enter your passport details, double-check the passport number, surname, and given name against the photo page of your passport.
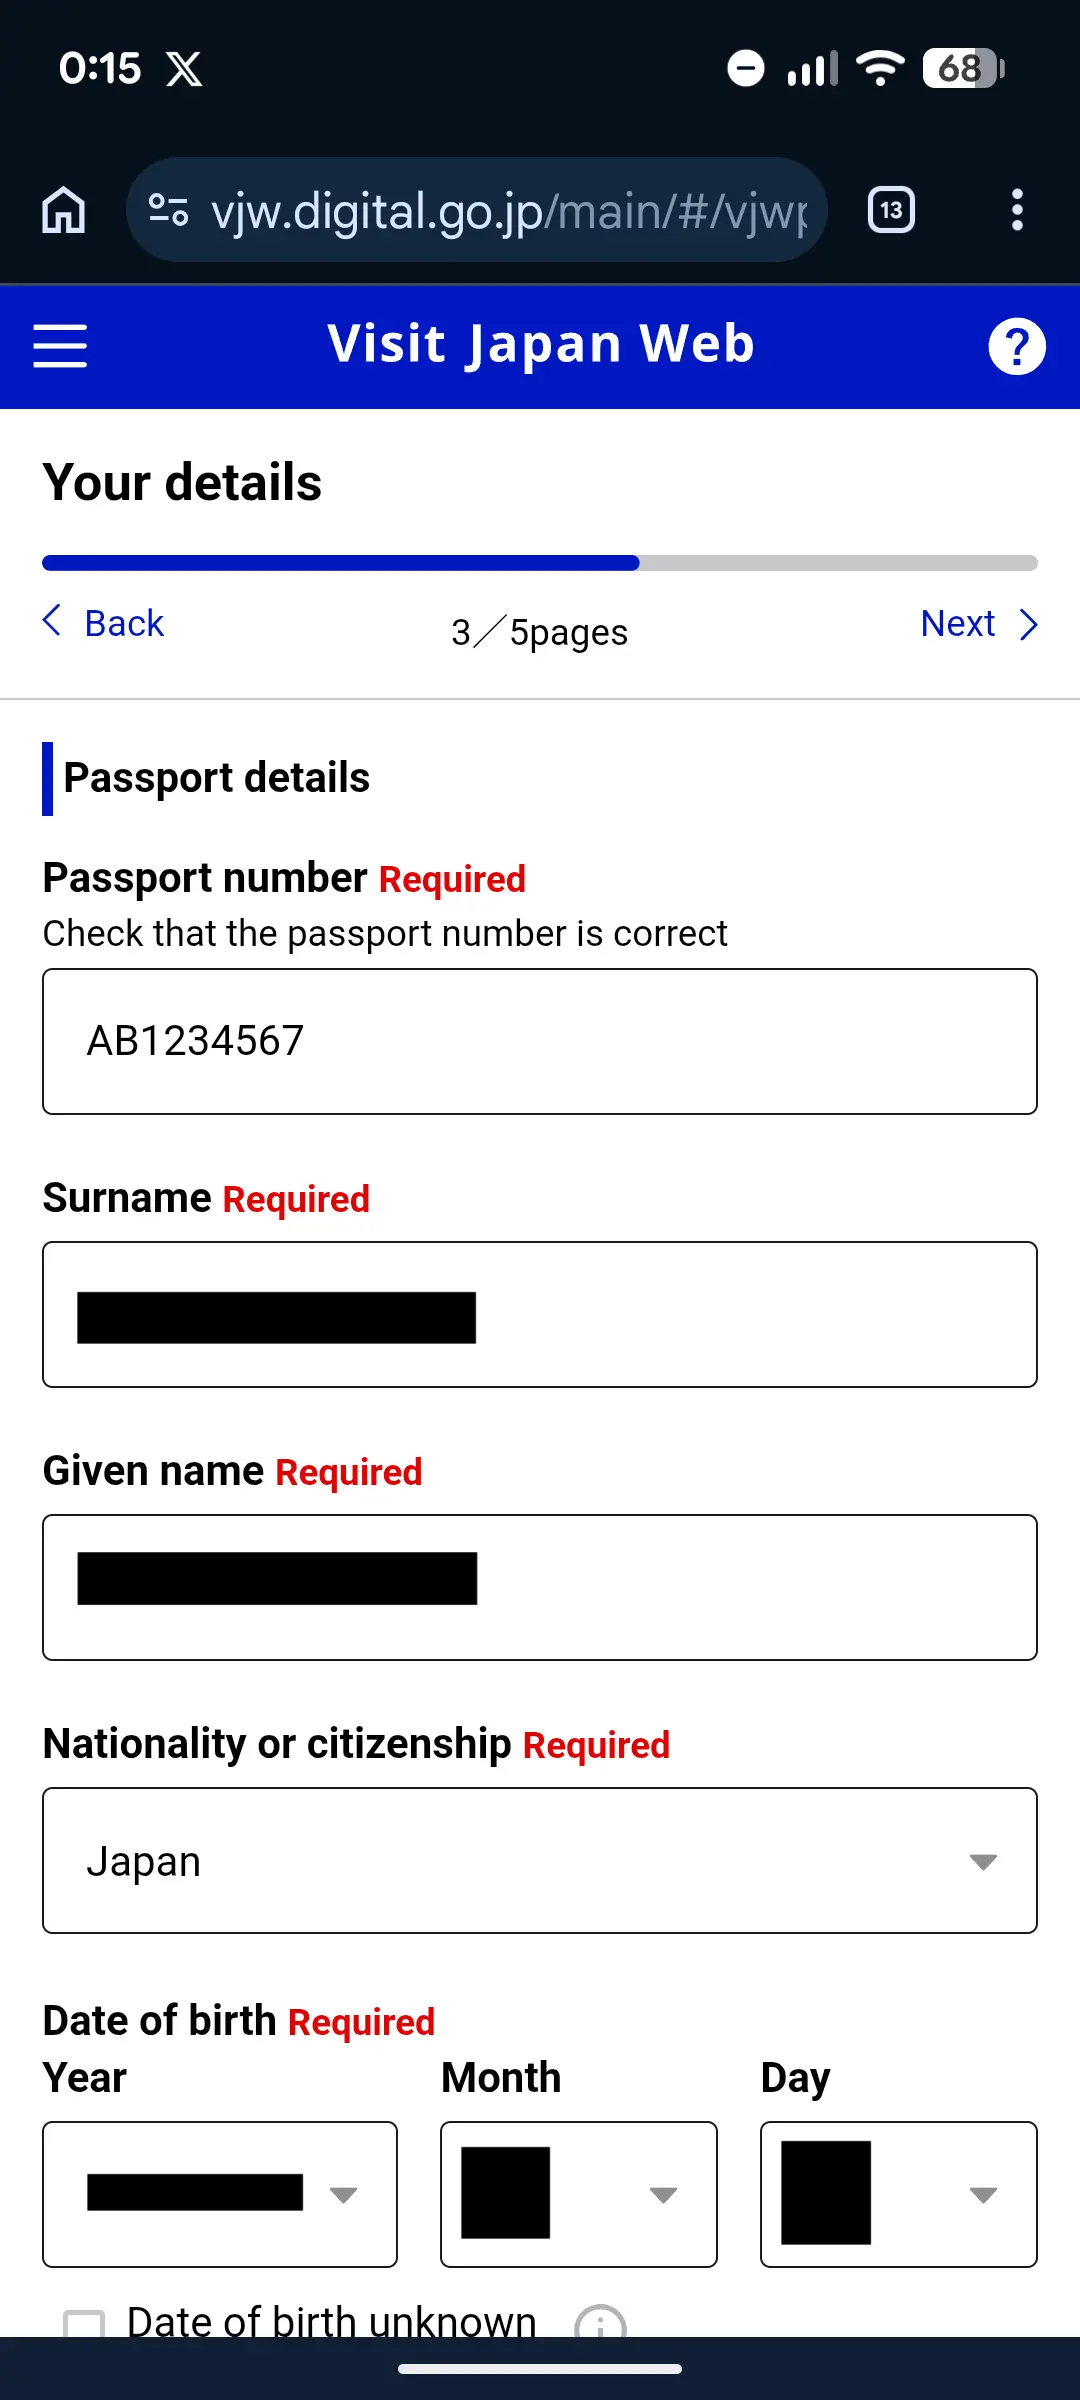
Use the exact same name that appears on your passport, in the same order. If your passport says "SMITH JOHN MICHAEL", enter it exactly that way. Mismatches at the Machine Readable Zone (the two lines of text at the bottom of your passport photo page) cause problems at immigration.
Step 2: Register Your Trip
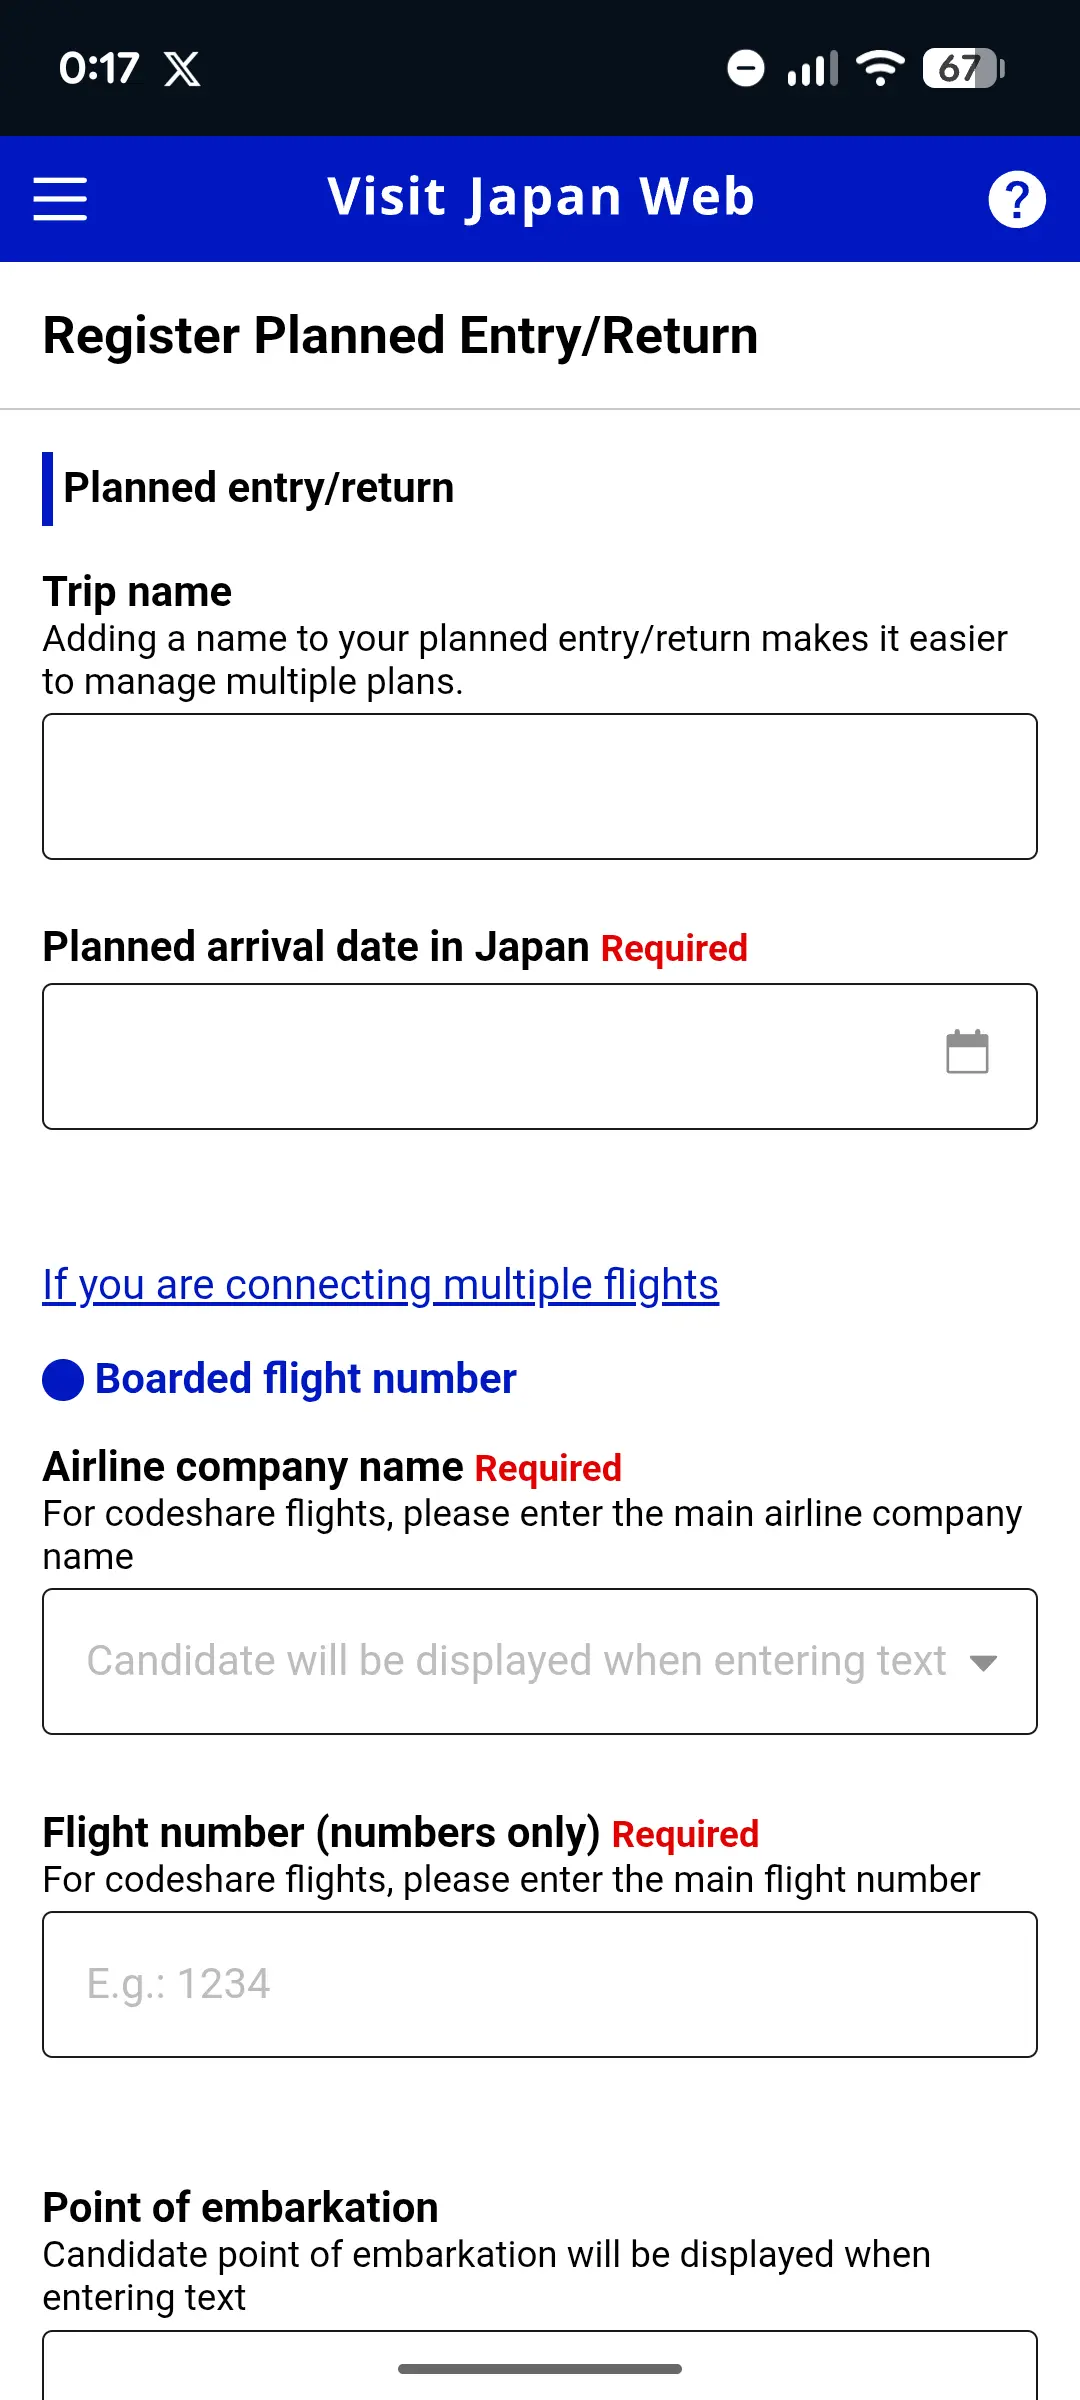
Once logged in, tap "Register new planned entry/return" — the wording used in the current official manual — and enter:
- Arrival date in Japan
- Airline name and flight number (e.g., ANA NH104)
- Airport of arrival (Narita, Haneda, Kansai, etc.)
Step 3: Complete the Immigration Section
After your trip is saved, you'll land on the Japan entry/return procedure screen. For an ordinary foreign visitor, the current official manual shows a combined "Immigration Clearance and Customs Declaration" procedure under the trip. Open that procedure to enter both sets of information.
The cards shown on this screen vary by traveler type. Japanese nationals and some foreign residents using a re-entry flow may see a customs-only procedure instead of the combined visitor procedure. Follow the labels shown for your applicant; a customs-only screen from another traveler's account is not a reliable guide for a first-time foreign tourist.
This replaces the paper "Disembarkation Card" you'd normally fill out on the plane. You'll provide:
- Purpose of visit (tourism, business, etc.)
- Intended length of stay — Japan excludes the arrival date and counts from the following day through departure; see the worked date examples
- Accommodation in Japan (hotel name, address, phone number)
- Country/city from which you're departing
- Standard security questions (criminal history, drug offenses, etc.)
Checking your duration? For a January 1 arrival and January 15 international departure, the arrival-excluded count is 14 days. This follows the day-count example in the Japanese consulate's visa application guidance. Enter your planned trip length, not an assumed 90-day allowance.
Date calculation only. Your visa or landing permission determines your permitted stay. Dates are not saved or included in our calculator-use analytics.
For the field-entry explanation, see what to enter on Visit Japan Web. If you are also completing a separate visa application, our previous-stay examples explain how to report earlier visits. Keep that travel history separate from this trip's intended duration.
Review your answers carefully and submit.
Step 4: Complete the Customs Section
Continue through the customs questions inside the same combined procedure. The form uses a series of short yes/no pages and asks about:
- Items you're bringing into Japan (alcohol, tobacco, perfume, gifts, etc., where they exceed duty-free limits)
- Whether you're carrying over ¥1,000,000 in cash or financial instruments
- Whether you have any prohibited or restricted items
- Gold, commercial goods or samples, items someone else asked you to carry, and separately shipped baggage
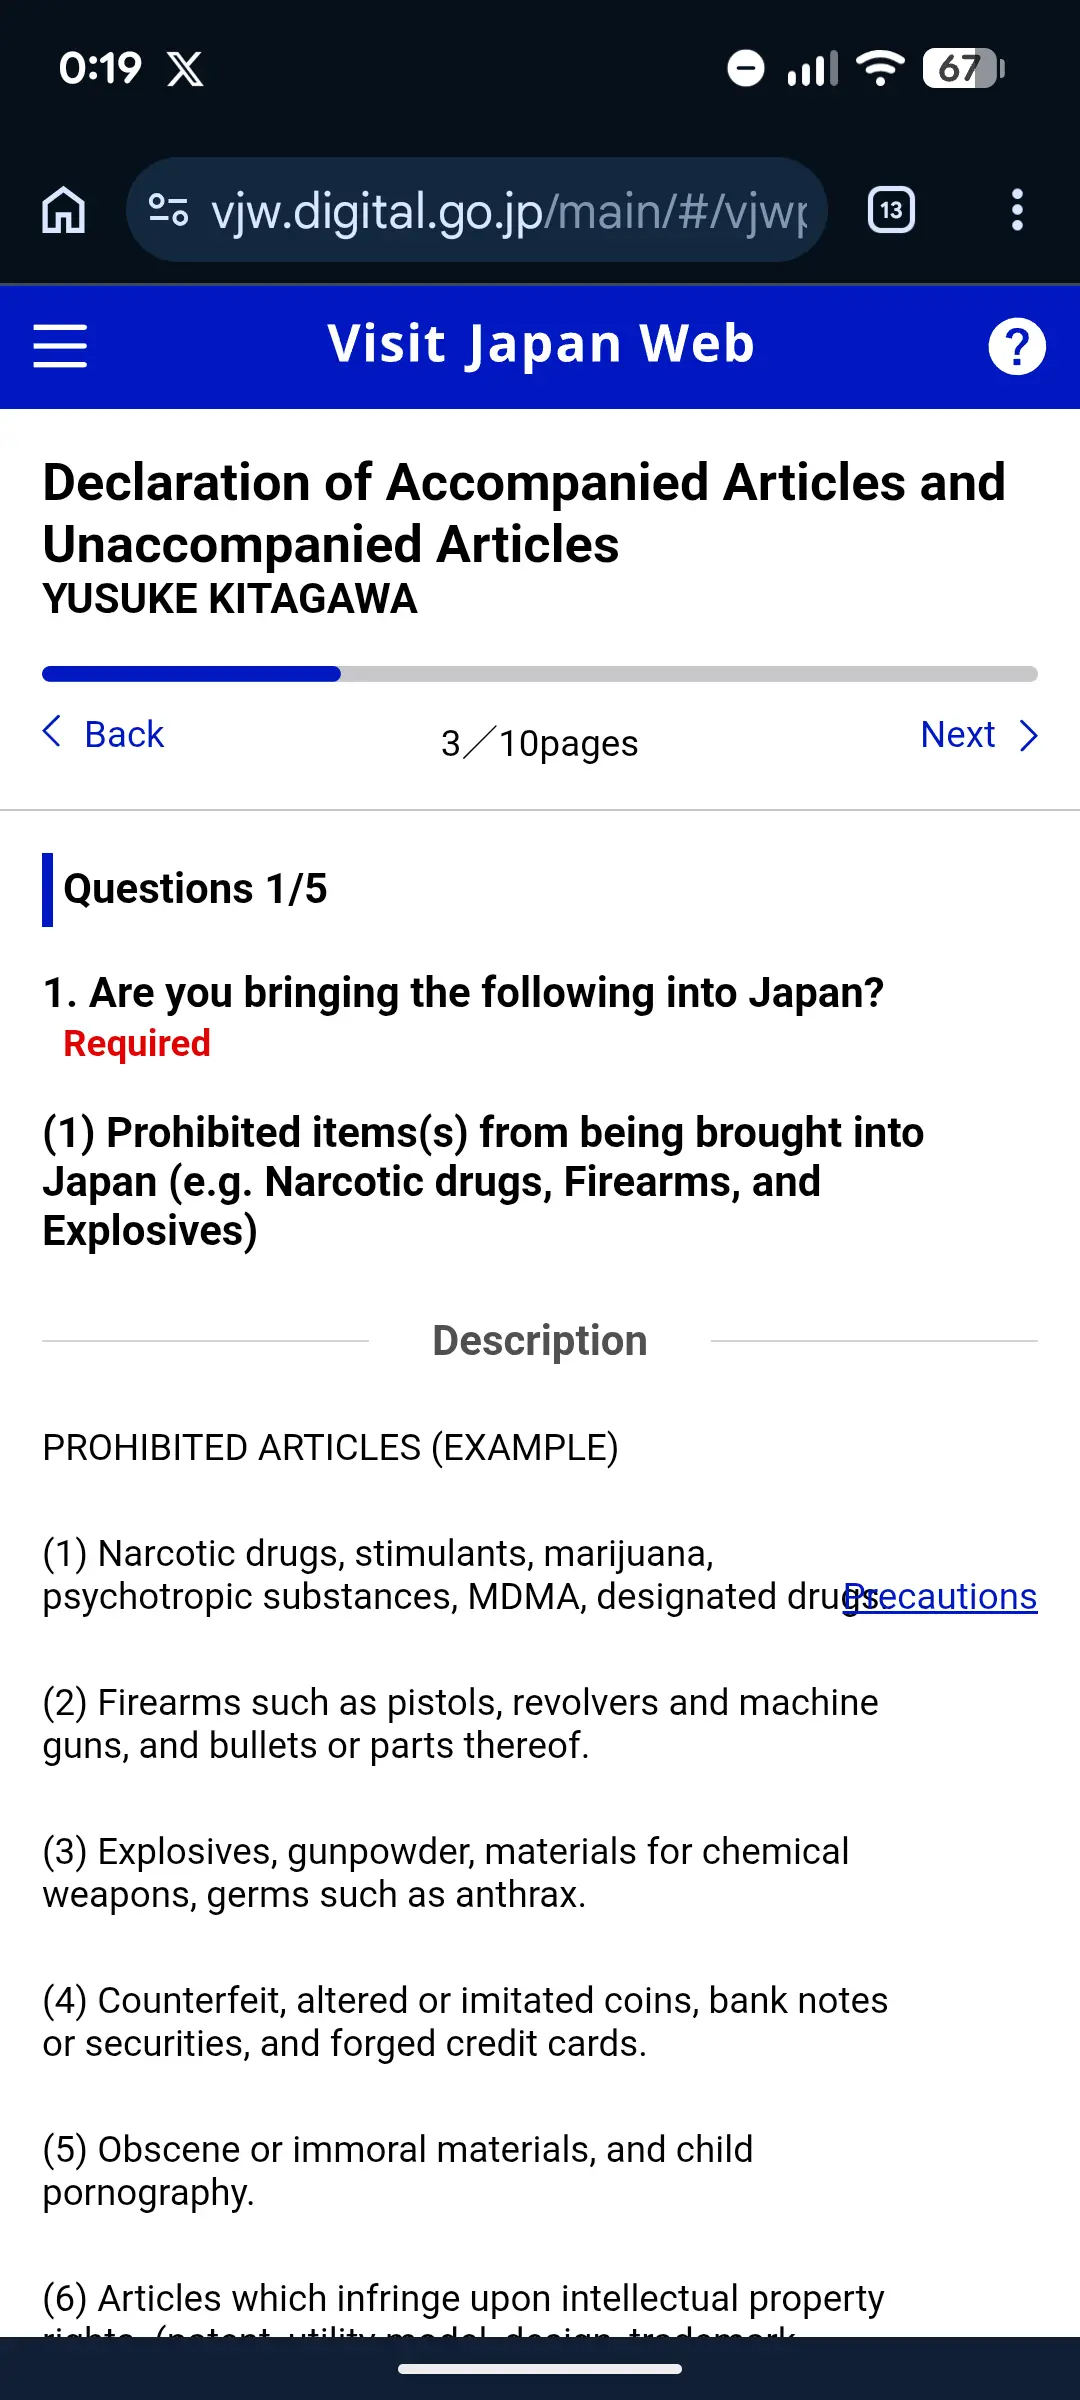
Do not select "No" automatically because you are on holiday. The official customs declaration form asks several distinct questions, including ones unrelated to exceeding a duty-free allowance. For help with commercial goods or samples, allowances and restricted items, use our Japan Customs Declaration Guide.
Step 5: Confirm Your Unified 2D Code
Once the combined immigration and customs procedure is complete, return to the procedure screen and use its display QR code control. Confirm that the code is for immigration clearance and customs declaration, not the separate tax-free-shopping QR.
Visit Japan Web generates one unified 2D code for arrival procedures — not two separate codes. In the standard customs flow, scan that code and your IC passport at an electronic declaration terminal, ideally while waiting for checked baggage. After collecting your bags, proceed through the facial-recognition e-Gate or follow directions to a staffed inspection counter.
The official service accepts a screenshot of the 2D code. Save a fresh screenshot after your final edit: if you change registered information, display and capture the newly generated code rather than using the old image.
The screenshot keeps your code available offline. For maps, hotel messages and onward transport, check whether your existing roaming plan covers Japan. If you need another option, compare eSIM compatibility, validity and data allowances before buying.
At the Airport: Using Your Unified 2D Code
The exact flow depends on which airport you arrive at.
Joint Kiosks (Integrated Immigration + Customs Terminals)
Joint Kiosks process immigration and customs in a single transaction. They are no longer a pilot — Japan Customs publishes the rollout by airport and terminal:
| Airport | Terminal | Start date / status | Where |
|---|---|---|---|
| Kansai (KIX) | Terminal 1 | 1 April 2025 | Immigration flow area and inside the inspection area |
| Kansai (KIX) | Terminal 2 | 1 April 2025 | Inside the immigration inspection area |
| Haneda (HND) | Terminal 2 | 1 April 2025 | Immigration flow area and inside the inspection area |
| Haneda (HND) | Terminal 3 | 16 April 2025 | Immigration flow area and inside the inspection area |
| Narita (NRT) | Terminal 1 | 24 September 2026 | Follow airport signs and staff directions |
| Narita (NRT) | Terminal 2 | 24 September 2026 | Follow airport signs and staff directions |
| Narita (NRT) | Terminal 3 | 7 April 2025 | Inside the immigration inspection area |
| Fukuoka (FUK) | — | 1 December 2025 (inspection area) · 1 April 2026 (flow area) | Both |
Japan Customs announced on September 18, 2026 that Narita Terminal 1 and Terminal 2 would begin Joint Kiosk operations on September 24, 2026. That announced start date has now passed; follow airport signs and staff directions for the route available when you arrive. Haneda Terminal 3 handles most of Haneda's international arrivals; Fukuoka added its immigration-flow-area kiosks in April 2026.
At a Joint Kiosk you:
- Approach a Joint Kiosk
- Scan your Visit Japan Web 2D code and your IC passport
- Follow the on-screen instructions (face recognition, fingerprints for foreign nationals)
- Follow the letter displayed on screen to the dedicated immigration booth and complete immigration inspection — the kiosk does not replace this step
- Collect your checked baggage
- Proceed to Customs: passengers cleared for the electronic gate can pass using facial recognition; follow staff directions to an inspection counter if required
This integrated route is designed to remove duplicate submissions and can reduce processing time when it is available; queues and any additional inspection still affect the total time.
Standard Flow (Other Airports or Joint-Kiosk Lanes Full)
Where Joint Kiosks aren't available, immigration and customs are still two separate stops — but you scan the same 2D code at both.
Immigration (passport control):
- Find the Visit Japan Web lane where available, or proceed through general immigration
- Scan your 2D code at the kiosk or show it to the officer
- The officer takes your photo and (for foreign nationals 16 and older) fingerprints
Customs (terminal before baggage pickup, e-Gate after pickup):
- Use the electronic customs declaration terminal while waiting for checked baggage when available
- Scan your passport and 2D code at the terminal
- Follow the on-screen instructions, then collect your baggage
- Follow your route to the facial-recognition e-Gate or the staffed inspection counter. The QR and passport scan happens at the terminal; the e-Gate normally verifies your face
Customs officers can still select you for a baggage inspection even after a successful e-Gate scan. The 2D code speeds up paperwork; it does not guarantee skipping a manual check.
Registering Family Members
If you're traveling with family, you can register multiple travelers under one account:
- From the home screen, tap "Details of family members traveling with you" (this is the exact label in the official manual — there is no button called "Register Traveler")
- Add each family member's passport details
- Check that each person is included in the correct planned entry/return, then complete their required immigration and customs information
- Display each traveler's entry 2D code and check the name and trip before saving it
Added a family member but can see only your own QR code? Adding their passport details is only part of the setup. Check the selected traveler and planned trip, and confirm that their arrival procedure is complete. Repeat the check for every person; do not assume your code covers the whole family. Use the official operating guidance if the screen differs from the examples here.
Children: Parents can register children under their account. Children under 16 don't need fingerprinting at immigration. Each traveler — including children — still needs their own 2D code. Japan Customs says Joint Kiosk users normally complete the process one by one, but children under 135 cm cannot use a Joint Kiosk because of the equipment specification. In the standard customs flow, a child under 100 cm may pass through the e-Gate with a family member after the declaration-terminal step. Follow staff directions for your family.
Common Mistakes to Avoid
1. Name doesn't match passport Your name on Visit Japan Web must exactly match your passport — middle names, order (family name first vs. given name first), spelling. Check the Machine Readable Zone (the two lines at the bottom of your passport photo page) for the exact format.
2. Skipping the customs section Many travelers complete the immigration form but forget the customs declaration. The 2D code only includes both procedures when both sections are completed. If you skip customs, you'll be filling out a paper customs form at the airport.
3. Registering too late While you can technically complete it on airport WiFi after landing, this defeats the purpose. Do it at home where you can calmly look up your hotel address, flight details, and passport information.
4. Using a third-party paid service Visit Japan Web is 100% free. Some third-party sites charge money to "help" you register. The Digital Agency issued a notice about exactly this on 2025-06-05, stating that it never asks Visit Japan Web users to pay any fee. You don't need them — this guide and the official site are all you need.
The Digital Agency also announced that the substitute entry function was discontinued on 2025-06-02. That notice concerns a specific service feature; it does not remove the separate accompanying-family feature described above. Check the official service notices rather than paying a site that implies registration carries a government fee.
5. Not saving the 2D code offline Airport WiFi can be slow or unreliable. Screenshot your 2D code before boarding so you don't depend on connectivity right after landing.
6. Following an old guide that mentions blue/red QR codes Any guide that tells you to scan two separate QR codes is out of date. Since 2024-01-25 there is one unified 2D code for immigration and customs. The standalone Customs Declaration App that previously generated a separate code is no longer effective.
Pre-Arrival Checklist
Use this checklist to make sure you're ready before your flight. Aim to start at least a week ahead so you're not scrambling on departure day.
2+ weeks before departure
- ✅ Create your Visit Japan Web account at vjw.digital.go.jp
- ✅ Enter passport details — name exactly as printed on your passport
- ✅ Register every traveler in your party (each person needs their own 2D code)
- ✅ Review existing cover and travel insurance options. Check cancellation terms and purchase deadlines before relying on a policy for non-refundable bookings.
1 week before departure
- ✅ Confirm flight number, arrival date, and arrival airport
- ✅ Enter your accommodation address and phone number
- ✅ Complete the Immigration / Disembarkation section
- ✅ Set up an eSIM so you have data the moment you land — no scrambling for slow airport WiFi
Day before / day of departure
- ✅ Complete the combined Immigration Clearance and Customs Declaration procedure shown for each visitor
- ✅ Verify the unified 2D code displays correctly
- ✅ Screenshot the 2D code to your photo library for offline access
On arrival in Japan
- ✅ Show the 2D code at the immigration kiosk (or to the officer)
- ✅ At standard-flow airports, scan your passport and 2D code at the electronic declaration terminal, preferably while waiting for baggage
- ✅ After baggage claim, follow directions to the facial-recognition e-Gate or staffed inspection counter
Check each traveler's code for the current planned arrival, including children. Display and save a fresh code after completing or correcting their information; a code saved for an earlier trip is not your new trip's arrival registration.
Living in Singapore? Check Your Cover Before Departure
Before paying for another policy, check whether your existing card, employer or private insurance covers your Japan trip. If you need additional cover, use your actual country of residence and travel dates when comparing quotes. Travel insurance is optional and is not required to use Visit Japan Web.
Live elsewhere? Use the travel insurance comparison for your country of residence.
Supported Airports (Electronic Customs Gates)
The electronic customs declaration gates (e-Gates) are available at seven international airports:
| Airport | IATA | City |
|---|---|---|
| Narita International | NRT | Tokyo |
| Haneda | HND | Tokyo |
| Kansai International | KIX | Osaka |
| Chubu Centrair | NGO | Nagoya |
| New Chitose | CTS | Sapporo |
| Fukuoka | FUK | Fukuoka |
| Naha | OKA | Okinawa |
Smaller regional airports may not have e-Gates yet — present your 2D code (or paper form) as directed at the staffed counter instead. Cruise-arrival procedures can differ by port and voyage, so confirm the current instructions from your cruise line and arrival port rather than assuming the airport flow applies unchanged.
Visit Japan Web vs. Old Systems
You might see references to "MySOS" or "Visit Japan Web (Fast Track)" online. Here's the simplified timeline:
- MySOS — used during COVID-19 for health screening. No longer exists.
- Visit Japan Web (Fast Track) — COVID-era feature for vaccine/test certificates. No longer required.
- Visit Japan Web (current, 2026) — handles immigration, customs, and tax-free shopping registration. Immigration and customs share a unified 2D code (since 2024-01-25); tax-free is a separate QR generated within the same account.
If you find guides online mentioning health declarations, vaccine uploads, or separate blue/red QR codes, they're outdated.
From November 1, 2026, Japan's tax-free shopping shifts from the current store-instant exemption to a refund-at-departure model, and Visit Japan Web gains a role at the end of your trip as well as the start. At Narita, Haneda, Kansai, Chubu, Fukuoka, New Chitose and Naha, the Japan Tourism Agency says departing travelers can complete the first step of the tax-free refund online through Visit Japan Web — on dedicated Wi-Fi in the departure lobby, before the security checkpoint — instead of queuing at a kiosk terminal. Customs inspection, if you are directed to it, still happens in person. Our Japan Tax-Free Shopping Guide 2026 walks through the whole refund flow.
After You Enter Japan
Once every traveler's latest entry code is ready, check the practical arrangements you still need for arrival.
Start with the journey to your hotel: choose the guide for Narita, Haneda or Kansai. Compare the route for your terminal, arrival time, luggage and hotel area before booking a transfer.
Choose Your Mobile Data
If your current roaming plan is unsuitable, compare eSIMs by phone compatibility, trip length and data needs. Check each plan's activation rules.
Compare optionsGet a Suica or PASMO
Check how an IC card fits your route and how to use it on local trains and buses. Keep airport express-ticket requirements separate.
Train guideCheck JR Pass Value
Taking several long-distance train journeys? Compare your planned route with individual tickets before buying a rail pass.
Run the calculatorCompare Options If You Still Need Them
Visit Japan Web is free and does not require an eSIM or an insurance purchase. The optional comparisons below contain affiliate links: we may earn a commission at no extra cost to you. If your existing arrangements already meet your needs, keep them.
In a hurry? Here's the short answer
Compare two mobile-data options. Check that your phone is compatible and unlocked, then review the plan's validity, activation rules and allowance.

Start here if stated Docomo + KDDI access and 5G matter for a route beyond the largest cities.

A straightforward alternative for Tokyo, Osaka and Kyoto when the live data allowance and validity fit your trip.
If you need travel insurance, use our comparison guide to check residence eligibility and policy differences. The optional quote below is for eligible non-US residents; confirm your full journey dates and read the issued terms before buying.


Heymondo Travel Insurance
Medical and cancellation cover for a fixed-date trip
Best for
Eligible non-US residents whose Japan dates are already fixed
Before booking
US residents are excluded; confirm the issued limits, exclusions and planned activities before buying.
Why it may fit
A straightforward first quote when your Japan dates are set. JAPANODE readers receive 5% off where eligible. Heymondo excludes US residents; always check the issued policy, limits, and planned activities before buying.
For everything else you need to know — from cash culture to train etiquette — read our comprehensive First Time in Japan guide.
Official service link, customs question categories and consular day-count example rechecked: 2026-10-14. Joint Kiosk procedure and rollout rechecked: 2026-10-07. Primary sources: Visit Japan Web (Digital Agency), Operating guidance and current manual links, Official customs declaration form, Consular day-count example, Announcements, Unified 2D Code Announcement (2024-01-25), Japan Customs e-Gate, Joint Kiosk guidance, and the Narita Terminal 1/2 launch announcement. The dated September 18 Customs notice gives September 24 as the start date for Narita Terminal 1/2; older overview pages may still list only Terminal 3. Procedures can change without notice — verify with the official Visit Japan Web site before travel.
Frequently Asked Questions
It is not mandatory. Travelers can still use the applicable paper arrival forms instead. Visit Japan Web is the government's free electronic option and generates a unified 2D code for a foreign visitor's immigration and customs procedures.
You can create your account in advance. Complete and review the immigration and customs procedure before departure so you are not entering passport, flight and accommodation details after landing. Reopen the latest 2D code after any edit.
No. Visit Japan Web is a completely free service provided by the Japanese government. There is no fee to register or use it. Be cautious of third-party websites that charge a fee to 'help' you register — the official site is all you need.
Yes. You can add another planned entry/return in the same account. Review all traveler, flight, accommodation, immigration and customs information for the new trip rather than assuming older answers still apply.
You can edit the relevant planned entry/return information before completing the airport procedure. After an edit, display the latest 2D code again and replace any screenshot you saved earlier.
Keep your passport ready and ask airport staff for the correct lane or paper alternative. A fresh screenshot of the 2D code is accepted by the official service and can help if connectivity is the problem, but it will not fix incorrect or incomplete registration data.
No. Visit Japan Web is only for international arrivals into Japan. Once you are in the country, domestic flights and trains do not require any additional registration.
Visit Japan Web is operated by Japan's Digital Agency. Use only the official vjw.digital.go.jp service, and review its current terms of use and privacy policy for what information is collected, why it is used and how it is handled.
You may be able to complete it after landing if you have internet access, but Visit Japan Web is optional and the applicable paper forms remain the fallback. Completing and checking it before departure avoids relying on airport connectivity or entering detailed information in the arrivals area.
Use your planned arrival and international departure dates in Japan. The arrival-excluded count is departure date minus arrival date: arriving January 1 and leaving January 15 gives 14 days. Enter the actual planned duration, not a maximum visa-free allowance. Check the current form instructions for how the duration fields are displayed.

Written by
JAPANODE
Based in Japan, sharing real travel tips & local insights for visitors. Follow us on Instagram @thejapanode for daily Japan content.
You Might Also Like
 Planning
How to Count Your Intended Length of Stay in Japan
11 min read
 Planning
Long-Stay & Digital Nomad Travel Insurance for Japan (2026): What You Actually Need
10 min read
 Planning
Japan Customs Declaration 2026: Visit Japan Web Guide
13 min read
 Planning
First Time in Japan: 15 Things You Need to Know Before You Go
19 min read
 Connectivity
Best eSIM for Japan 2026: 5 Providers Compared
20 min read
 Transportation
The Complete Guide to Japan's Train System for First-Time Visitors
16 min read